
The Wild Harvest Table website is a resource for game and fish
recipes, nutrition information, and preparation techniques from Cornell
Cooperative Extension's Moira Tidball.
Whether you are cleaning out the freezer to make room for this hunting season or you have fresh venison, bear, or goose meat, canning is an excellent way to prepare wild game meat into tender, tasty morsels! By pressure canning the meat, it becomes very tender and is ready to eat right from the jar. It taste similar to roast beef and makes for a quick supper or sandwich by mixing the canned meat with your favorite barbecue sauce. Canned meat is great to take to hunting camp and to have on hand if the power goes out. Meat must be processed in a pressure canner which can be intimidating at first, but is quite safe if done properly. Many Cornell Cooperative Extension county offices have educators that can help answer food preservation questions. Here are the guidelines for safely canning wild game meat:
BECOME FAMILIAR WITH THESE INSTRUCTIONS BEFORE YOU BEGIN THE CANNING PROCESS IN A PRESSURE CANNER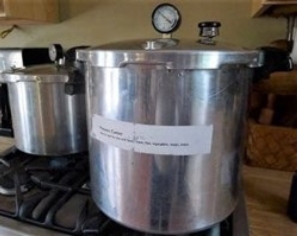
For
food safety reasons all MEAT MUST BE CANNED USING A PRESSURE CANNER.
Pressure canning raises the temperature above the boiling point which is
necessary to kill the anaerobic bacteria that causes botulism, a deadly
food-borne illness.
The following are general instructions for using a pressure canner:
1. Place 2 to 3 inches hot water in the canner. For hot packed food, the water may be gently boiling.
2. Set
the jars of meat (instructions for preparing meat are below) on the
rack in the canner so steam can flow around each jar. Be sure that hot
jars are placed in hot water, and if using the raw pack be sure the
water is a bit cooler. Jars will break if they are cold and put into
boiling or simmering water.
3. Fasten the canner lid so that no steam escapes around the seal.
4. Make sure the vent (petcock) is open.
5. Turn burner heat to high, and watch for steam to escape in a funnel shape from the open vent.
6. Allow steam to escape for 10 minutes.
7.
Close the vent, using a weight, valve or screw, depending on the type
of canner. If it is a weighted gauge with varying pressures, be sure to
use the correct pressure for the food and your elevation.
8. For
a dial gauge canner, let the pressure rise quickly to 8 pounds
pressure. Adjust the burner temperature down slightly and let the
pressure continue to rise to the correct pressure. (If the burner is
left on high, it will be difficult to regulate the pressure once it
rises.)
9. For a
weighted gauge canner, let the canner heat quickly at first and when
the safety lock engages adjust the burner heat down slightly until the
weight begins to rock gently or “jiggle” 2 to 3 times per minute,
depending on the brand of canner. Adjust the burner heat so as to have a
continuous rocking or jiggling 2 to 3 times per minute. Start counting
the processing time as soon as the weight rocks or jiggles.
10.
Keep the pressure constant by regulating the heat. Do not lower the
pressure by opening the vent or lifting the weight. Keep drafts from
blowing on the canner. Fluctuating pressure is one cause of liquid loss
from jars (siphoning) and for dangerous under-processing.
11. When processing
time is complete, carefully remove the canner from the heat. If too
heavy, simply turn off the heat. Removing the canner from an electric
burner is recommended.
12.
Let the pressure in the canner drop to zero. This will take 30 to 45
minutes in a standard heavy-walled canner and nearly an hour in larger
canners. Newer thin-walled canners depressurize more quickly. Do not
rush the cooling process by setting the canner in water or running cold
water over it. Never lift the weight or open the vent to hasten the
reduction of pressure. Proper depressurization is important for the
safety of the food.
13.
When canner is depressurized, open the vent or remove the weight. Older
canners are depressurized when the gauge on a dial gauge canner
registers zero, or when a gentler nudge to the weight on a weighted
gauge canner does not produce steam. Newer canners are equipped with a
safety lock. These canners are depressurized when the safety lock
releases. Sometimes safety locks located in the handle of the canner
will stick. If a nudge to a canner weight indicates it is depressurized
then run a knife blade between the handles to release the lock.
14.
Wait 10 minutes, unfasten the lid and remove it carefully. Lift the lid
with the underside away from you so that the steam coming out of the
canner does not burn your face. Do not leave the canner unopened to
completely cool. The food may spoil, and it may be very difficult to
open the canner hours after it has cooled.
15. Use
a jar lifter to carefully remove the jars as soon as the processing
time and depressurization time is over. Place the hot jars upright on a
rack, dry towel, wood board, or layers of newspaper to prevent the jars
from breaking contact with a cold surface. Leave at least 1” of space
between jars. Do not tip the jars to remove water from the lid as you
may disrupt the seal…the water will evaporate.
16. Do not tighten rings.
17. Allow jars to cool untouched for 12 to 24 hours.
Finishing the Canning Procedure:
1. Cooling Jars – Place hot jars on a cloth or rack so air can circulate freely around them. Keep hot jars out of cold drafts.
2.
Jar lids should not be re-tightened after processing. As jars cool, the
contents in the jars contract, pulling the self-sealing lid firmly
against the jar to form a high vacuum. Most two-piece lids will seal
with a “pop” sound while they’re cooling.
3.
Testing for Seal – When jars are completely cool to the touch (about 12
hours), test each jar for a seal. Jars with flat, metal lids are sealed
if:
- Lid has popped down in center.
- Lid does not move when pressed down with a finger.
- Tapping
the center of the lid with a spoon makes a clear ringing sound. A dull
thudding sound may indicate a weak seal or that food is touching the
underside of the lid. To determine which, hold the jar up and look at
it.
4. If a jar is not sealed, refrigerate and use the meat within 2 or 3 days.
Storage:
1.
Remove, wash, dry and store metal screw bands in a dry place to retard
rusting. Wash jars and label each jar with contents, date processed and
lot number if more than one canner load was processed on the date with a
permanent marker on the lid. For best quality, store between 50ºF and
70ºF in a dry place to prevent the lids from rusting and possibly
breaking the seal.
2.
Before opening each jar, look for bulging lids, leaks and any unusual
appearance of the food. After opening, check for off-odor, mold, foam or
spurting liquid. Never taste questionable foods.
References: USDA’s Complete Guide to Home Canning, So Easy to Preserve, 5th Edition, Cooperative
Extension Service, The University of Georgia; National Center for Home Food Preservation website: http://www.uga.edu/nchfp/
Recipe for Canned Canada Goose, Bear, or Venison Cubes
1.
Choose high quality, chilled meat. Remove excess fat, sinew, and silver
skin. If using previously frozen meat, don’t use meat that has freezer
burn or has been frozen for more than a year as the quality and flavor
may not be ideal.
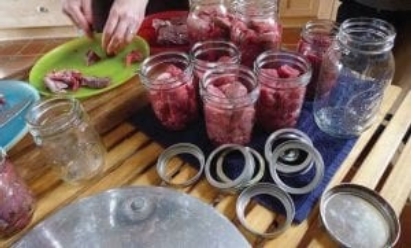
2. Cut meat into about 1 inch cubes, or bite sized.
3.
Strong-flavored wild meats, such as Canada goose, old bucks, and bear
should be soaked for 1 hour in a brine made from 1 tablespoon salt per
quart of water. Rinse meat with cold water after removing from brining
liquid and proceeding to hot or cold pack preparation for canning.
Hot Pack Preparation
1.
Pre-cook meat to the rare stage by roasting, stewing or browning in a
small amount of fat. Browning in a skillet is often easiest.
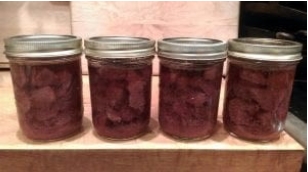
2. Pack meat loosely into hot jars, leaving 1-inch headspace.
3. Fill jar to 1 inch from the top with boiling meat juices, broth, water or tomato juice
4. Remove air bubbles. Add more liquid if necessary to reach 1” head space.
5. Wipe jar rim. Place prepared lid on jar and hold in place with ring. Tighten ring finger tight.
Raw Pack Preparation
1. Pack raw meat into hot jars, leaving 1-inch headspace.
2. Do not add liquid. 3. Wipe jar rim. Place prepared lid on jar and adjust jar ring finger tight.
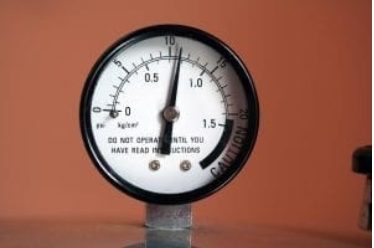
Process in a Dial Gauge
Pressure Canner at 11 pounds pressure using the guidelines listed above.
OR in a Weighted Gauge Pressure Canner at 10 pounds pressure.
Pints process for 75 minutes once you reach proper pressure.
Quarts process for 90 minutes once you reach proper pressure.
