In my last Illinois Times column I reviewed the recently published The Noma Guide to Fermentation. During the past month I have been working my way through several of its recipes. However, I’ve discovered that fermentation is more than merely following a recipe. It’s also about being a good shepherd, providing optimal conditions for microbial growth. Think about it: humans have coevolved over time with millions of bacteria inhabiting our gut. This symbiosis helps us better digest certain foods, and a happy internal microbiome is critical to our physical and emotional well-being.
My first project was butternut squash vinegar. The Noma Guide to Fermentation recommended fermenting for 10 to 14 days then straining the vinegar through cheesecloth and bottling and storing it in the refrigerator. I tasted the vinegar at 10 days; it was mild, but very clean and bright. I used it to season a batch of butternut squash soup I made for an out-of-town cooking event last month. The soup received rave reviews. However, being pressed for time, I had failed to bottle and refrigerate the rest of the fermenting vinegar before I left on my trip. When I returned and bottled my vinegar, I noticed that it had picked up a mild, funky taste and smell that wasn’t there previously. I had fermented it a little too long.
My next project was celery vinegar. Aside from problems with the stringy celery clogging up the juicer, the fermentation went well, and at day 10 all the alcohol taste had vanished and the resultant vinegar retained the taste of fresh celery. It is fragrant and bright tasting. The celery vinegar is now bottled up in my refrigerator, ready to season a soup or be made into vinaigrette.
Encouraged by my success, I am now fermenting my vegetable scraps: kale and broccoli stems, turnip and beet tops and cabbage cores.
The kitchen table in my tiny rental house is beginning to look like a microbiology lab with bubbling jars of soonto-be vinegars and jars and crocks of krauts and kimchi. My next goal is to undertake some more complex projects such as soy sauce and miso. This will require building a fermentation chamber with temperature
and humidity controls. With the Thanksgiving and Christmas holidays
approaching, I’ve had to move my existing fermentation setup from the
kitchen table into the laundry room. Construction of the new
fermentation chamber will have to be postponed until the holidays are
over.
Anxious to keep my fermentation project going, I thumbed through The Noma Guide to Fermentation looking
for another project with a less-elaborate setup. The last chapter in
the book is titled “Black Fruits and Vegetables.” The process involves
placing a fruit or vegetable in a sealed container and maintaining a
constant temperature of 140 F for 6 to 8 weeks. The resultant fruits or
vegetables develop a deep black color and acquire a very rich, almost
chocolatey sweetness. Lacto-bacteria cannot survive at this temperature
so the process is technically not fermentation, but rather a
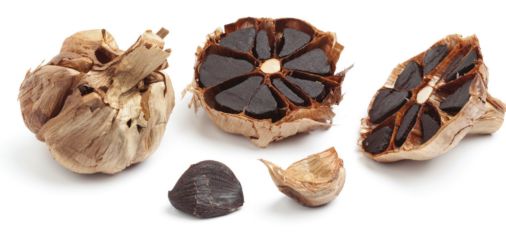
temperature-driven enzymatic transformation. A rice cooker with a “keep
warm” setting is an ideal black garlic “incubator.”
I
bought a dozen heads of locally grown garlic, sealed them in a
Seal-A-Meal bag, and placed the package in my electric rice cooker. The
“keep warm” setting of the rice cooker is very close to the required 140
F. Six weeks later my garlic was dark
black, had an earthy fragrance, was putty-like in texture and tasted
like dark chocolate. Gone was the garlic’s characteristic heat. Also
gone was the garlic’s resultant bad breath.
RICE COOKER BLACK GARLIC 
Try
to find the freshest, moistest heads of garlic. Discard any bruised or
moldy sections. If you have a vacuum sealer, package whole heads in a
single layer that will fit in your rice cooker. Otherwise seal tightly
with two layers of foil. Place a trivet or a few canning jar rings on
the bottom of a rice cooker to elevate your garlic package
and allow air to circulate beneath. Set the rice cooker on the “keep
warm” setting. Inspect the garlic after a week. The skins should look
tan and moist. Periodically turn the package over. Allow garlic to
blacken for 6 to 8 weeks. When ready, allow the garlic to sit out on the
counter overnight to dry out. Then refrigerate if using within a couple
weeks or freeze for later use.
Black
garlic shouldn’t be substituted for fresh garlic in recipes. It has its
own distinctive taste in the same way that balsamic vinegar tastes
different from white vinegar. Softer and subtler than fresh
garlic, it is best paired with milder-tasting ingredients like mashed
potatoes or pureed cauliflower. Because it’s less assertive than fresh
garlic, plan on using more cloves. Try mashing a few cloves, blending
with a little olive oil, adding a pinch of salt and spreading on a
crostini. Combine black garlic and mayonnaise in a food processor to
make a quick black garlic aioli to use as a sandwich spread. Save the
skins and use them to add flavor to chicken stock. Or make this
buttermilk “ranch” dressing.
BLACK GARLIC BUTTERMILK DRESSING
Try this as a veggie dip or as sauce for roast chicken or lamb.
4 medium heads black garlic, left whole but peeled
1 cup buttermilk
1 tablespoon champagne vinegar
1½ teaspoon salt
3/4 teaspoon black pepper
1 cup olive or grapeseed oil
Peel the garlic cloves.
Put everything in a blender but the oil and puree. With the blender running, slowly stream in the oil.