
It’s a family favorite, especially for my mom and me. In fact, it’s such a favorite that if my husband, Peter, is making Mother’s Day brunch or dinner for us at home, mom or I will make a rhubarb pie ourselves rather than Peter making another dessert. (Peter is an outstanding cook, but has yet to enter the world of pie-making.)
Rhubarb is a leafy vegetable that makes such delicious pie that early Americans called it “the pie plant.” It’s a beautiful perennial in the garden: forming a four- or five-foot mound of ruffled leaves with glimpses of ruby red stalks underneath. In spring, huge stalks of flowers shoot forth; both in bud and flower, they look like some weirdly beautiful image a biologist might see under a microscope. I have an arrangement of them on our fireplace mantle.
The stalks are what make that scrumptious pie; the leaves themselves are poisonous, though not deadly. The reason is that they contain high levels of oxalic acid. Small amounts of oxalic acid are found in most leafy dark greens, and dozens of other fruits and vegetables from asparagus to watercress, including sweet corn and strawberries. Fortunately, the pale green to ruby red rhubarb stalks are completely and deliciously edible.
Rhubarb is really, really tart and needs lots of added sugar (other fruit pies usually take half as much, give or take) to make a good pie. That’s the other reason it’s my mom’s and my favorite Mother’s Day dessert. We try to limit our intake of refined sugar, so rhubarb pie is a once-a-season special treat.
Rhubarb pie
• 1/2 c. all-purpose flour
• 2 c. sugar, plus additional for sprinkling
• Pinch of salt
• 6-8 c. rhubarb, cut into approximately 1/2-inch slices
• 2 T. butter, approximately
• Pie pastry for a double crust 9-inch pie, chilled In a large bowl, stir together the flour, sugar, and salt until no lumps remain. Mix in the rhubarb thoroughly.
Preheat the oven to 450 F. On a floured surface, roll out half the pie pastry into a circle big enough to fit into a 9-inch pie tin with a couple inches of overhang. Gently fit it into the tin without stretching the dough. (See below for tips.) Place the pastry-lined pan in the refrigerator or freezer while rolling out the top crust.
Roll out the remaining half of the pastry into a circle large enough to completely cover the pie tin with a couple inches of overhang. Sprinkle the sugar over the surface, and gently roll the rolling pin over it to make the sugar adhere. Coarse natural sugar, variously labeled sugar-in-the-raw, Demerara or turbinado makes an especially crunchy topping.
Remove the pastry-lined pan from the refrigerator or freezer. Immediately pour in the rhubarb filling and spread it evenly, then dot the surface with bits of the butter.
Gently cover the pie with the sugar-sprinkle pastry circle. Fold the bottom overhang over the top overhang, trimming off any excess. Pinch the edges with your fingers or a fork to seal, then make a few cuts on the top to allow the filling to vent, using a decorative pattern if desired.
Place the pie in the oven and bake for 15 minutes. Lower the heat to 350 F. and bake for another 40-45 minutes, until the filling is bubbly and the crust nicely browned. The pie must cool to at least barely warm before serving. Makes one 9-inch pie.
Pie pastry For 2 crusts: • 2 1/2 c. unbleached all-purpose flour or 1 c. all-purpose flour and 1 1/2 c. whole-wheat flour • 1 tsp. salt • 1 T. sugar • 1/2 c. each unsalted butter and unhydrogenated lard, preferred, or 1 c. unsalted butter • 1/3-1/2 c. ice water All ingredients and utensils must be cold or cool.
To
make pastry in a food processor: Cut the butter into small pieces and
freeze. If using lard, spread on a small plate and freeze.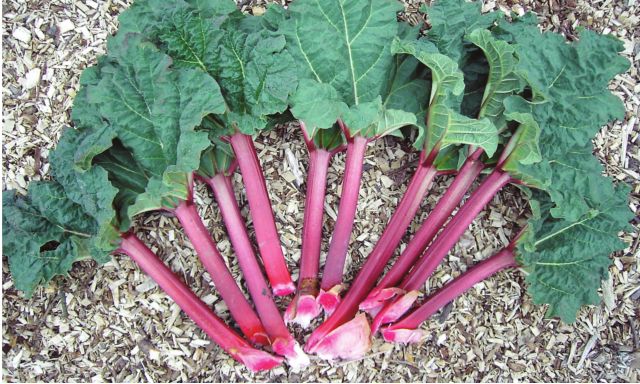
Put
the flour, sugar and salt in the food processor’s bowl. Cut the frozen
lard into pieces and add to the bowl along with the frozen butter.
Turn on the processor and immediately pour in the ice water (without ice pieces). Process just until
the mixture is combined and forms a crumbly mass. Test by pinching a
bit of dough between two fingers. If it holds its shape, it’s ready. If
not, add more ice water by tablespoons. Don’t over process.
Working
quickly so the ingredients stay cold, turn dough out onto a floured
surface. Gather it into a rectangular mass and knead three or four times
with the heel of your hand pushing outward, a process called fraisage.
Fraised dough has more elasticity and less tendency to crack around the
edges when rolled. Enough gluten develops so it’s easier to roll, but
not enough to toughen it. Fraisage flattens the bits of cold shortening
between the dough, ensuring flakier pastry.
Divide the dough in half. Flatten each into an approximately 6-inch disc, one slightly larger than the other.
Put
the larger disc on a floured surface. Coat a rolling pin with flour by
placing flour into a cupped hand then, holding the rolling pin with the
other hand, move its surface up and down in the flour in your other hand
until it is lightly coated. Use light strokes from the middle outward,
rotating as you roll. Sprinkle just enough flour onto the rolling pin, dough and rolling surface to avoid sticking.
If
making pastry with a pastry cutter or two knives, cut the shortening
into small pieces. Chill well. Put the flour, salt and sugar in a large
bowl; add the shortening. Cut it into the flour until it resembles
coarse meal. Stop when there are pea-sized clumps of shortening. Drizzle
in 1/3 cup ice water; stir until the dough begins coming together. Do not overwork! Add more water by tablespoons if necessary. Test and proceed as above.
Tips for making pie pastry •
Keep all ingredients cold.
• Remember: The goal is to make dough that
holds together without completely emulsifying the shortening into the
flour.
• Don’t overwork the dough.
• Don’t be afraid to patch the pastry
with a little cold water or beaten egg.
• When rolling out the pastry,
use just enough flour to keep the dough from sticking – dust off excess
flour before baking.
• Make sure there are no cracks or holes in the
bottom crust before pouring in the filling – patch with extra dough or
seal with a little beaten egg, then bake a minute or so until the egg is
set.
• Use pans that conduct heat well – perforatedbottomed pans work
best; if using disposable aluminum pans (they work extremely well),
lightly pierce their bottoms with a sharp paring knife a few times.
•
For double-crust pies, make the filling before rolling out the top
crust, then pour in the filling, immediately cover with the top crust,
and put in the oven.
Contact Julianne Glatz at [email protected].
