Dressing up the windows for a church project
If you were to take a peek into my home, you would probably notice it is comfortable and lived in. At any given moment, you will probably find a trail of toys. We have action figurines and Cheerios hidden in the oddest of places, and that is OK because this stage of life we are in will not last forever. As nitpicky as I can sometimes be, I have to remind myself that I am OK with these messes; my children are having fun.
I am not a designer, but I do know what I like, and I like to go the most affordable route as often as possible. (Who doesn’t?) If you took a look around our home, you would also probably notice there are several DIY projects we have under our belts. We have remodeled our kitchen, changed flooring, updated the bathrooms and painted to our heart’s content.
One project I recently tackled was a DIY curtain rod. However, I cannot take credit for this one in my own home. This project got its start in a small building our church is remodeling and intending to use for our young singles group. The building was previously a small garden nursery, and as you can imagine, it has many windows – seven floor-to-ceiling windows to be exact.
This project has been my husband’s “baby.” He has remodeled the entire space from top to bottom, inside and out. One project he gave me free reign on was the designing of the curtains. Initially, it was our intention to purchase fabric and make the curtains ourselves. However, after researching costs for fabric, the estimated total was just too high for what we had budgeted.
After a trip to Home Depot to peruse the aisles, (lately, this seems to be where I get all my ideas) I thought, “Why not use drop cloths for the curtains?” My idea then evolved further into, “Why not make the actual curtain rods ourselves, too?” I pitched the idea to my husband, who told me to write out the estimated cost, and then we would go from there. After doing some research, I
estimated that, in total, the project would cost us a little more than
$250. This was more than half of what it would have cost had we decided
to order fabric and sew the curtains ourselves. Not to mention how
time-consuming the overall project would have been (time just isn’t
something I have plenty of nowadays). Using drop cloths meant no sewing
was involved, and the curtains could be hung literally as soon as the
rods were in place. The materials you need for this simple DIY are:
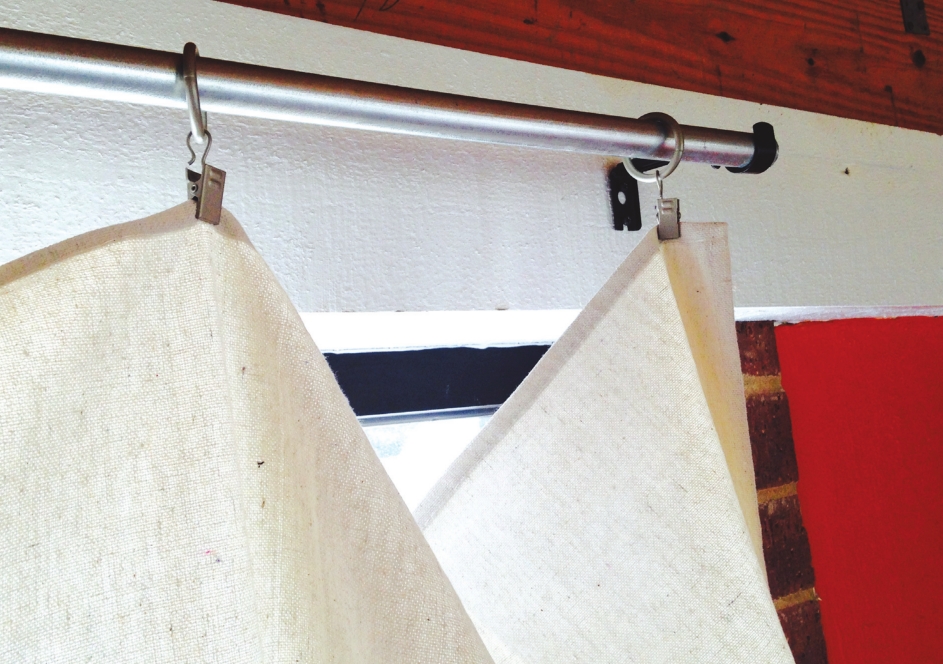
• Electrical conduit. Conduit at Home Depot was $1.99 for 10 feet.
•
Curtain brackets. You can also find these at Home Depot. These are the
brackets that screw into the wall and support your curtain rod. Make
sure it will hold the same size diameter as your conduit.
• Drop cloths. These average from about $15-$30 apiece, depending on what size you need.
• Curtain clips. Just clip these onto the drop cloths and slide the rings onto the electrical conduit.
Now
that you have all your supplies on hand, you are ready to assemble your
curtain rod. Simply install the curtain rod brackets onto the wall with
a drill and some screws and put your conduit in place. Since we liked
the industrial look of the conduit, we left them as is. You could easily
spray paint the conduit to whatever color you would like. Maybe a shiny
sleek black or perhaps a vintage rust color would look great!
Currently,
you will find a more “industrial” look in catalogs, online and in
stores which sell home goods. Mixing the different textures and colors
of natural wood with a metal is a very popular look and one which I
think will stand the test of time.
Our
drop cloth curtains and rod is a simple DIY and is one easy way you can
incorporate that “industrial” look into your home at a fraction of the
cost. You can get the same look as the high-end catalogs; you just need
to be a little creative. Find what you like through browsing the
magazines and then visit your local thrift stores, junk yards, garage
sales, etc. You are bound to get your juices flowing, and you will
definitely make something wonderful and one-of-a-kind.
